SAP-1 Emulator: Assembly programming
A downloadable game for Windows
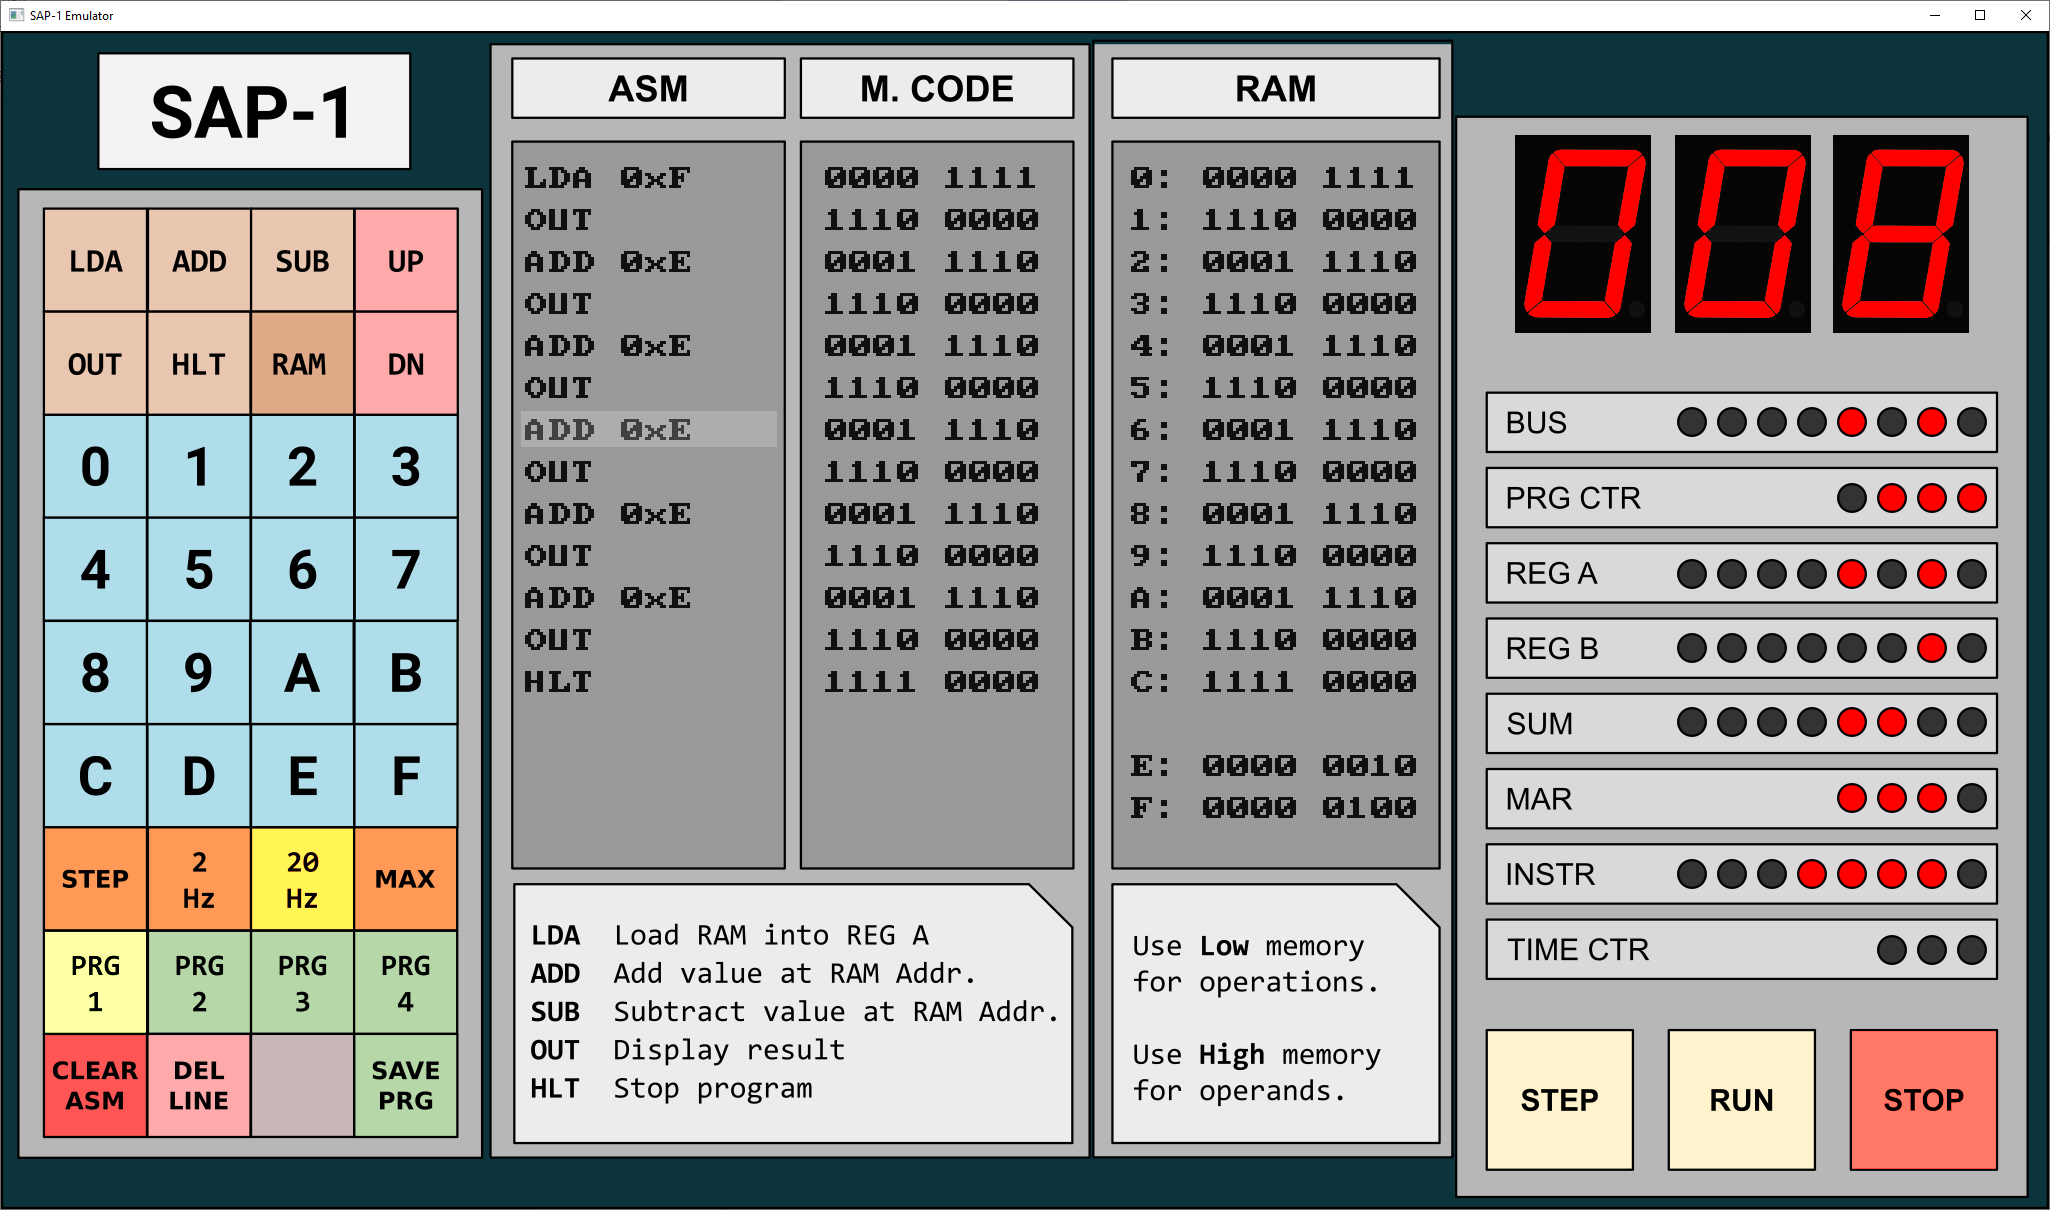
SAP-1 Emulator
A visual emulator written in Go using the ebiten 2D game library. Enter Assembly instructions and manipulate memory values by entering instructions on the keypad interface. Run simple programs to add, subtract, and display results. Step through programs to watch how the registers behave at each step.
The SAP-1 "Simple As Possible" emulator is inspired by the chapters about Simple As Possible Architecture from Digital Computer Electronics: 3rd Edition by Albert P. Malvino and Jerald A. Brown. It has been designed as a visual learning tool for fun and experimentation.
Program 1 (PRG-1) is loaded on startup, and contains a sample program that adds a few numbers, increments a few times, and displays the result on the numeric readout.
To run a program, ensure the 20 Hz clock speed button of the keypad is highlighted by clicking it, and press the RUN button at the bottom right. You should see activity in among the Light-emitting Diode (LED) banks to the right as the computer executes the program. After a moment, the result should be displayed on the digital numeric readout at the top right.
Once the program has reached the Halt command (HLT), it will stop and the STOP button will illuminate. At this point, you can press RUN to run the program again.
Binary, Hexadecimal, and Decimal Numbers
SAP-1 provides a keypad with hexadecimal input (0-F, which is 0-15 in decimal).
SAP-1 represents Machine Code (M. Code) in binary as MSB (Most Significant Bits) and LSB (Least Significant Bits). The binary value range is 00000000 - 11111111, or 0-255 in decimal
SAP-1 represents Memory addresses in hexadecimal, and stores values in binary.
Instructions consist of entering Mnemonics and sometimes a corresponding memory address in hexadecimal format.
There are 5 instructions: LDA, ADD, SUB, OUT, and HLT
Three of the instructions, LDA, ADD, and SUB require a corresponding hexadecimal value to be entered on the keypad. When these instructions are selected, the 0-F keys of the keypad will highlight, indicating they are to be used to enter values of 0-15 for the desired location in memory used with the instruction.
Read more about the individual instruction mnemonics below.
Instructions can be entered at the highlighted line in the Assembly window (ASM). Use the UP and DOWN keys to move the line cursor to a different line. Use DEL LINE to remove the highlighted line. Use CLEAR ASM to clear the entire contents of the ASM window.
Whenever an instruction is entered on the keypad, the corresponding binary representation for the command and any memory address value will be represented in as binary digits in the Machine Code window (M. Code).
Additionally, the same binary value will be shown along with the memory address where the command resides in the Memory window (RAM).
When a program is executed, the Program Counter (PRG CTR) will start at "0" and load the first instruction from that memory address. As the program cycles, it will increment the P CTR, and subsequent instructions will be loaded from RAM address 1, 2, 3 and so on, until the program reaches a HLT, or until reaching address 15, after which the program will wrap around and continue to run from 0.
Usage: LDA [address]
Example: LDA 0xF
Key Pad Entry: LDA + 0 thru F
LDA stands for "Load Accumulator", and will populate a value from memory into the accumulator, known as "REG A" (Register A).
The instruction accepts a single hexadecimal input, which corresponds to the memory address of the value to load.
Usage: ADD [address]
Example: ADD 0xE
Key Pad Entry: ADD + 0 thru F
ADD stands for "Add", and will take the value at specified memory address and move it to the buffer register, known as "REG B" (Register B). During program execution, the contents of REG B will be summed with the contents of REG A, and will be indicated in the Sum Register (SUM). The value from SUM will then be moved to REG A where it can be used later in the program.
The instruction accepts a single hexadecimal input, which corresponds to the memory address of the value to use.
Usage: SUB [address]
Example: SUB 0xD
Key Pad Entry: SUB + 0 thru F
SUB stands for "Subtract", and will take the value at specified memory address and move it to the buffer register, known as "REG B" (Register B). During program execution, the contents of REG B will be subtracted from the contents of REG A, and will be indicated in the Sum Register (SUM). The value from SUM will then be moved to REG A where it can be used later in the program.
The instruction accepts a single hexadecimal input, which corresponds to the memory address of the value to use.
Usage: OUT
Example: OUT
Key Pad Entry: OUT
OUT stands for "Output", and will take the contents from REG A and display the numeric equivalent on the digital numeric readout in decimal form.
The instruction does not accept any inputs.
Usage: HLT
Example: HLT
Key Pad Entry: HLT
HLT stands for "Halt", and will immediately stop the program when executed. It is important to use HLT at the end of the program to ensure that execution does not run over into values set in RAM, which would result in computer garbage.
The instruction does not accept any inputs.
In order for your program to have any meaningful output, you must supply values for LDA, ADD, and SUB. This is done by reading values from Random Access Memory (RAM) locations. The values stored in RAM provide the program values to work with.
Typically, RAM values are entered into High memory, that is, any memory address that comes after a "Halt" instruction (HLT). The values up to the point where HLT is entered are known as Low memory.
Entering values into High memory requires four (4) key presses:
RAM + Memory Address + MSB + LSB
MSB = Most Significant Byte, entered as 0-F on the keypad
LSB = Least Significant Byte, entered as 0-F on the keypad.
Memory addresses can hold up to 8 bits, with the MSB holding the 4 most significant bits, and LSB holding the 4 least significant bits.
Example: if MSB = 1 and LSB = 0, then the MSB & LSB = 0001 0000, or 16 in decimal.
Another example: if MSB = F and LSB = FF, then the MSB & LSB = 1111 1111, or 255 in decimal. 255 is the maximum value that can be stored in any RAM location.
Reading Digital Numeric Display
The 3 numeric digits at the top right show the decimal value moved from REG A to BUS when the OUT instruction is executed. The Digital Numeric Display (DND) can display decimal values from 0 to 255 before "rolling over" to 0 when reaching 256. After rolling over, the DND will continue to display values 0-255.
For example, the following program will display 255 on the DND, when RAM address "F" is set to FF (binary: 1111 1111).
LDA 0xF OUT HLT
The SAP-1 can be run at 3 different speeds: 2 Hz, 20 Hz, and MAX by selecting the matching button on the keypad.
You will notice the program and activity LEDs responding at different rates when choosing different clock speeds.
MAX will run the emulator at a maximum speed of the frame draw rate, which is dependent on system load and monitor refresh rates.
You can step through a program by pressing the STEP button at the bottom right. Each press of the STEP button will increment the Time Counter (TIME CTR) by one.
Note: You can also set the "STEP" button on the keypad clock rates to disable the automatic clock advance when the RUN button is engaged. This is generally a good practice as it will prevent accidental runs when using step mode.
SAP-1 provides 4 program slots which can be accessed using the PRG 1 thru PRG 4 buttons on the keypad.
The SAVE PRG button will save the currently selected program to a file matching the program number in the "src" directory that should have been included with the SAP-1 emulator. The contents of RAM will be saved in another file in the same directory.
To load a program, simply click the appropriate PRG button. If you want to discard changes you have made, click the PRG buttton to refresh the previously saved state.
Download
Click download now to get access to the following files:
Development log
- SAP-1: Assembly ProgrammingMay 22, 2022

Comments
Log in with itch.io to leave a comment.
Amazing but clunky. Still haven't figured out how to divide yet lol.
Nvm figured out how to.